Create a Planner and Agenda that Actually Works for YOU!
At the beginning of every year, like clockwork, I put together my planner. It’s a little ritual I’ve had since high school and I can’t imagine life without one. Some people call them “agendas” or “day planners,” but you know what I’m talking about. They’re the spiral bound, fill-in-the-blank, monthly and daily calendars designed to organize every aspect of your life. One year, not long ago, I realized that the one-size-fits-all planners they sell in stores don’t actually “fit” my life or planning style at all. I started making my own (for a fraction of the price!) and have never looked back.
If you’re like me, you find that the planners they sell in stores don’t cut it for several reasons. The typical store-bought planner doesn’t work for you because it’s trying to work for everyone. They contain a monthly and weekly calendar, sure, but they’re also jam packed with a million things you may never use—-meal planning, daily goal setting, daily affirmation writing, workout schedule, water intake, journal entries, gift ideas, birthday reminders, cleaning schedule, kid chore charts, etc. Some of them want you to write a novel a day. I want my planner to help organize my life so I can go live it, not spend my life writing in it!
Back in the day, I would buy a planner with all the added ‘stuff,’ then not use the ‘stuff,’ then feel unproductive because I left giant chunks blank, then not use it as much because I wasn’t doing it “right.” Am I alone in this? Probably. Ha!

Nevertheless, I started combing office supply places for what I wanted. Simplicity. I want monthly calendars with epic ‘To Do’ lists and giant blank sections for notes and inspiration gathering. It dawned on me one day that ‘if you want something done right, you have to do it yourself.’ I knew exactly what I wanted, so I set out to make one myself.
And you can too! I promise it’s life changing.
How To Make a Planner that Actually Works for YOU:
1. Write down all the things you know you NEED in a planner. For me, that’s a monthly calendar (one month per page) with 2-3 giant, blank ‘To Do’ lists in between each month. I’m a die hard list-maker. My ‘To Do’ lists have two columns: one for work and one for home. I don’t make daily or weekly lists, I make everything lists. I write down every single thing in my life that needs to be accomplished, no matter how big or small. I like seeing everything all together; it helps me visualize and prioritize what tasks need to be completed before the other tasks written down. Figuring out what your planner actually NEEDS requires some real self-awareness.
- How do you record appointments and tasks?
- What do you always write down?
- If you’ve used planners in the past, what sections do you always fill out?
- If you’re a list maker, how do you format/compartmentalize your lists? Your organizational style lies in the answers to those questions. The style and sections you identified are the ‘keepers.’

2. Write down all the things you might WANT in a planner. The beginning of the year for many is about goal-setting. It’s always nice to include sections of your planner for goals you may have. In years past, I’ve included things like healthy meal planning, blank grocery lists, weekly goals, etc. Just like the store-bought planners, I barely used those sections—-partly because I use apps on my phone for those aspects of life, and partly because it’s just not in my nature to write those things down. So, I noted that for the next year’s planner and omitted those pages/sections. Every year I get better and better at making a planner that I love and that I use every square inch of. This isn’t to say you shouldn’t try out fun sections. Do it! Try one or two a year and if you use them and they become a healthy habit, great! If not, omit them for the next year and move on!
3. Print all the calendar pages and sections! This is the fun part. Take your list of things to include in your planner and go on a deep dive of free printables online. There are SO many options to choose from. It’s a beautiful rabbit hole of organization that warms my little Type-A heart. Pinterest is (of course) a great resource, but just Googling “free calendar printables” and “free planner pages” will lead you to some great resources as well. There’s also top notch things on Etsy if you don’t mind paying a small amount for downloading items. Print, then put everything in order–an order that makes sense to you.
This year, I used Cecilia & Sebastian Paper Company’s free printables for the calendar section of my planner.

4. Find a fun cover page! Or two or three! I’m always on the hunt for a cool piece of art or fun photograph for the cover of my planner. The cover needs to be the same size as the rest of your planner pages, but that’s really the only requirement.
In years past, I’ve used:
- My Kids’ Art
- Dreamy Anthropologie Catalog Pages
- Collage of Meaningful Family Photos
- Scrapbook Paper with Cool Patterns
- Vinyl Album Cover – Cut to Size
- Vintage Advertisements with Retro Lettering
- Gift Wrap
Anything you love or you find inspirational can be used! Think outside the box.
I find that my planner is always open to my calendar or giant ‘To Do’ list and I rarely see the actual cover throughout the year, so I don’t put as much stock into it anymore. But! I still recommend finding 2-3 covers you like and putting them in the front. Then, every few months or so, you can rip off the top cover and have a new one underneath, ready to go. This is a great idea if you like to shake things up based on the season or different holidays.
5. Head to your local copy shop and spiral bind that baby! Most copy shops will bind your planner for super cheap. Like, under $6 cheap. I use the local FedEx/Kinko’s in town and they have a lot of fun binding options, but I always pick spiral bound because it turns your planner into a spiral notebook. I’m addicted to spiral because when it’s open, it can fold back underneath itself without creasing pages. Also, when you get something spiral bound, they throw in the clear, plastic protective cover for the top and a black protective cover for the back. Suckers. I always leave the copy shop feeling like I ripped them off because $6 seems so cheap for something I use multiple times a day for an entire year. I love it.

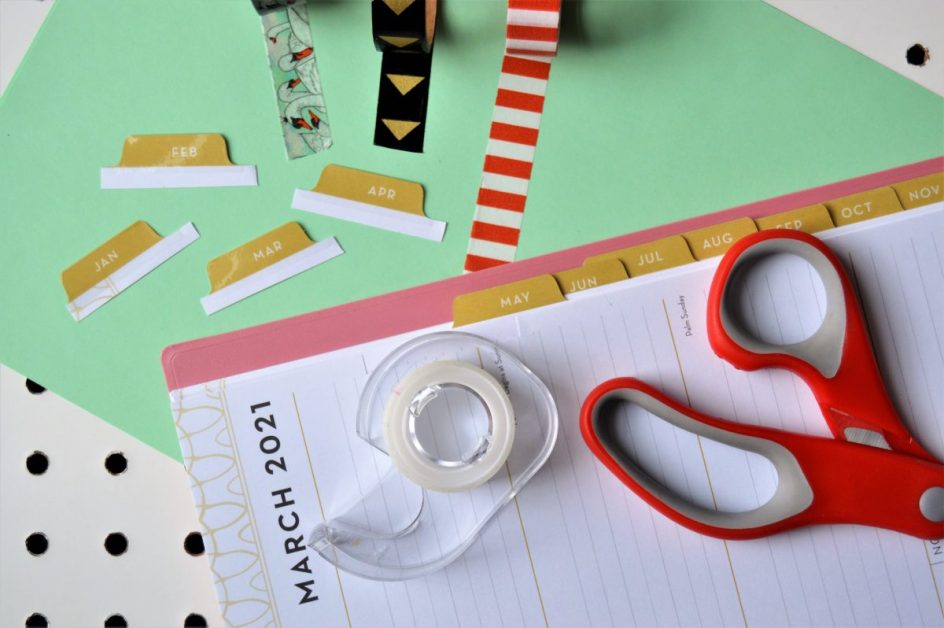
6. Add month tabs if you’re into that sort of thing. I am definitely into that sort of thing. I buy the cheapest store-bought planner I can find (usually the ones on clearance from the previous year), cut the tabs off, and scotch tape them onto my freshly made planner. I hide the scotch tape with patterned washi tape so it looks seamless. I also use the same tabs for at least 2-3 years/2-3 planners. They’re hardy little fellas that can handle a lot of cutting and taping. I love the ritual because I’m a weirdo.

Best of luck planning your planner! 🙂