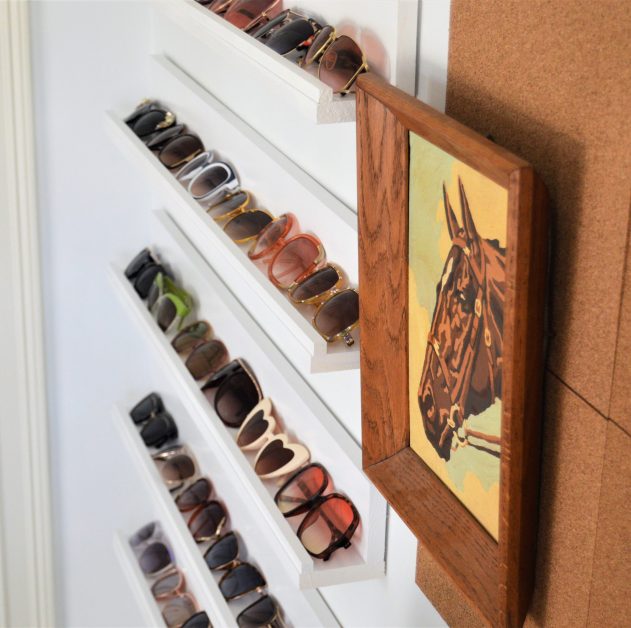
How to Make Easy DIY Sunglasses Shelves for Display

I’m a firm believer that every person out there has that one accessory they’re most drawn to. Their weakness. It’s more than fashion; it’s a full-blown collection. A functional collection, which makes it even more addictive to hoard. You can always reason with yourself over a functional collection. “But I need this. I actually USE this!” I’m the same way about cute storage solutions, oy.
Growing up, I always thought I was supposed to love shoes. That’s the classic “girl” accessory to obsess over. After all, I grew up watching Sex and the City. Carrie Bradshaw was a messiah to many a teenage girl like myself and I always wondered if I was weird for not coveting shoes the same way she did. I mean, I completely support a deep appreciation for Cosmos, but a compulsive shoe fetish? Was I somehow “less” of a woman for not fantasizing about $700 Manolo Blahniks?

It wasn’t till my mid-20s that I realized you don’t pick the accessory passion, the passion picks you. A strong sensitivity to sunlight, a strong awareness of my large head, and a strong infatuation for the 1970s led me to my oversized sunglasses collection. I was powerless against it.
It started small. You know, as most addictions do– buying cheap sunglasses in thrift stores and combing estate sales. Next thing I knew, I was stalking eBay like a psycho and bartering with strangers on the street. Zero chill and zero shame, by the way.

And can you believe it? One of the greatest loves of my life, my most impressive and prolific collections, and I store them all in an oversized bowl on a shelf. Well, no more, I tell you. NO MORE.
I found a spot in my office and decided I’d make some shelves. It’s a super easy project you could complete in a long weekend or so. Most of the time spent on the project is just waiting for the wood glue to dry. And the best part is: no drilling of any kind!
MATERIALS NEEDED:
- 1 x 4 Finished Boards— You will need 2 boards per shelf, so I bought 12 boards to make 6 shelves. If you cannot cut the wood yourself using a jigsaw or miter saw, have Lowe’s cut them for you in the desired length of your shelves.
- Trim – I used square, wooden dowels. One per shelf.
- Spray paint – In desired color of shelves. I chose white.
- Command Strips – Two per shelf.
- Clear Spray Sealant
- Wood Glue
- Clamps


Step 1 – Using wood glue, glue two boards together perpendicularly. One shelf should be glued directly on top of another creating a “bottom” shelf (where sunglasses will sit on) and a “back” shelf (that will be attached to the wall). See picture below for reference.

Step 2 – Tightly clamp shelves together until wood glue has completely dried, usually 12-24 hours. TIP: Unlike a lot of adhesives, wood glue does not dry clear. The wood glue will “seep” out of the cracks of your project when you clamp the wood together. Be sure to remove that with a wet paper towel or rag before it begins to dry.

Step 3 – After the glue on the two boards has fully dried, glue and clamp the trim (squared wooden dowels) to the front of the shelf. The trim is actually optional, but I knew I would need a little edge piece so my sunglasses would stay on the shelves should someone (me) walk by and accidently knock them off. I love the look of the wood trim and debated forever about painting it or not. Ultimately, I decided to paint the whole thing white to give it a clean look and let the sunglasses be the stars of the show.
Step 4 – Even though my boards were already painted white, I lightly spray painted each shelf with white spray paint to make sure the trim and the boards were the same color white. I finished everything off with a coat of clear sealant.

Step 5 – Once everything has time to completely dry, you’re ready for the fun part! Hanging the Shelves! I used my trusty Command Strips (two per shelf, one on each end) to hang the shelves 5 inches apart using a level and a tape measure.

They fit perfectly behind a door in my office. I love turning a never used, overlooked space into a functional spot for displaying or organizing something–and in this case, both! These shelves would be perfect for so many things: nail polish, spices, or any collection of small things.


